How to create gif-like loopable video clips
Index
Really quick introduction to digital video
Formats
Video files consist of one or more video and audio tracks, muxed together using a muxer, or container format. For html5 video (the one which can be played by browsers without a plugin, like flash), at this point in time, we’ll be interested only in two combinations:
- H264 video and AAC audio muxed into an MP4 file; and
- VP8 video and Vorbis audio muxed into a WebM file.
The first of these can be played out of the box, among the biggest browsers, by Chrome and Safari. The second, by Chrome, Firefox and Opera. For more info see this.
I’d personally recommend using webm whenever possible simply by the fact that it is open and free from patents and legal restrictions, but there are many factors involved in the decision and you should use whichever one is best for you.
During this tutorial, I’ll assume your source video (the one you’re extracting a clip from) is either an AVI or MP4, containing H264 video. I’ll also assume your final clip will not contain any audio.
Framerate
A video works by showing you a series of images in very short succession, creating the illusion of movement (which is also how TVs and computer monitors work). One of these images is called a frame, and the framerate is the amount of frames that are displayed during one second.
For most videos, the frame rate will be either 24 or 30 fps (frames per second). But to complicate things a bit, for technical reasons, these will not be exactly 24 and 30, but actually 24,000/1,001 and 30,000/1,001, which is why they will sometimes be referred to as 23.976 and 29.97 fps.
Below, there will be a time when you’ll have to opportunity to choose the framerate of your clip. If you want it to play at regular speed, just leave it the same as your source. If you want slow motion, choose a smaller value. I wouldn’t recommend going below 15 fps. If you just want a value to start experimenting, try 18 fps for 24 fps sources and 22 fps for 30 fps sources, this will give you approximately 3/4 of the original speed.
Bitrate and constant quality
Like the framerate, the bitrate refers to the amount of bits (that is, the size of the video) per second of video. The unit normally used is kilobits per second (1 kilobit = 1024 bits = 128 bytes). As you can probably tell, the higher the bitrate, the bigger the video and the higher the quality. A video’s bitrate is actually an average, since harder-to-encode scenes (lots of movement, etc) will use more bits and easier scenes will use less.
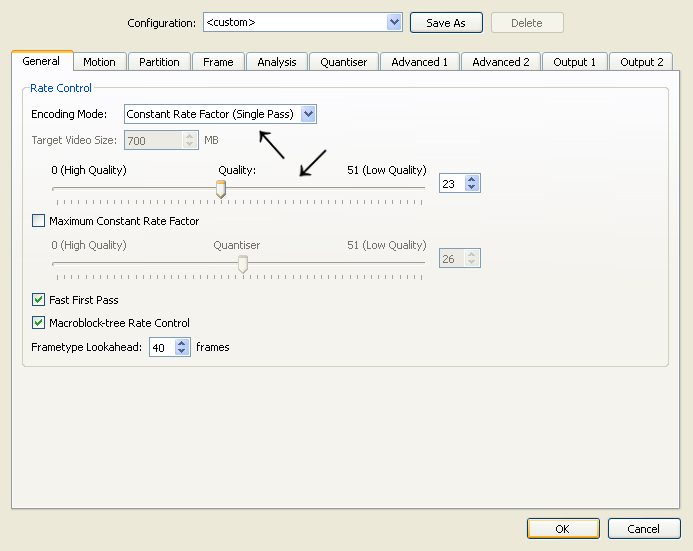
Encoders will also give you the option of choosing a quality level, so that the encoder will choose the bitrate for you, while trying to maintain that level of quality. The encoder we will be using for vp8 doesn’t handle this option well, at least for short clips, so I’d suggest always choosing a bitrate in that case. For the h264 encoders, you can use the constant quality, and in that case you will be prompted for the level you want (called CRF, constant rate factor), where 0 means the best quality (that is, lossless encoding, a.k.a. huge files) and 51 means the worst possible quality. I’d suggest staying in the range 20–25. If you just want a number to start experimenting, try 23. See this for more information.
Choosing a bitrate gives you even more choice, since you can pick anything above 0. Here’s a completely arbitrarily list of bitrates that should give you a small file (assuming your clip is short), but also good quality, depending on your the video’s resolution:
- 1080p (1920x1080): 8000 kbps
- 720p (1280x720): 3500 kbps
- 1024x576: 2300 kbps
- 640x480: 1200 kbps
- 480x360: 700 kbps
- 320x240: 300 kbps
Avidemux will also give you the option of calculating the bitrate for you based on the file size you want, so you can use that as well.
Keyframes
Keyframes are frames that do not depend on previous or future frames. They can be decoded immediately. If you want to cut your video without reencoding, you’ll have to cut between keyframes. If you are going to reencode, you can just cut anywhere.
Note that, when decoding non-keyframes, both avidemux and virtualdub have to decode form the previous keyframe, until the last frame referenced by the one you’re trying to see, which is why both programs are much slower when seeking backwards. So always try to go slightly before the frame you’re looking for, and then moving forward until you find it.
See this for more information.
Overview
This tutorial will teach you how to perform the following steps, in order to extract a small loopable clip from a larger video:
- cutting (removing all frames that should not be included in your clip);
- cropping (removing areas of the image that should not be included in your clip);
- scaling (resizing the image);
- changing the framerate;
- encoding to the correct video format (h264 or vp8); and
- muxing to the correct container format (mp4 or webm)
I’ll also be presenting you with two different programs (both free) for you to accomplish the first four steps, namely avidemux and virtualdub. Both have strengths and weaknesses, and I’d suggest trying both, seeing which one fits you best, and then also keeping the other available for cases where the one you chose refuses to work with a certain file.
By the end of step 4, virtualdub will have produced an AVI file containing H264 video, which will have to be either remuxed to MP4 or reencoded to VP8 and muxed to WEBM. Avidemux, on the other hand, will have produced an MP4 file which is ready for deployment, but can also be reencoded to VP8. In both cases, this reencoding and muxing to WEBM will be done by ffmpeg.
Installation of the necessary software
As noted above, you may not have to install all of these, but I suggest you do:
- Avidemux version 2.5 (avidemux 2.6 is out but it doesn’t work properly for me; also, if you’re not running windows, check this)
- VirtualDub (only available for windows; 64-bit here)
- x264vfw (only necessary if you’ll use virtualdub; 64-bit here)
- ffmpeg (only necessary if you’ll be encoding to webm; non-windows users should check this; 64-bit windows here)
Note that all of these are free software, and that only x264vfw actually has an installer, the rest, you just have to unzip and you’re good to go.
Windows users: we’ll be running ffmpeg from the DOS prompt, so you might want to copy the ffmpeg.exe binary into C:\windows\system32 so you can call it by simply typing “ffmpeg.exe” or simply “ffmpeg” (in contrast with also having to type the directories it is in). See the section on ffmpeg.
Avidemux tutorial
This is the tutorial for cutting, cropping, resizing and encoding using avidemux. If you want to use virtualdub, see its section below.
Opening the video
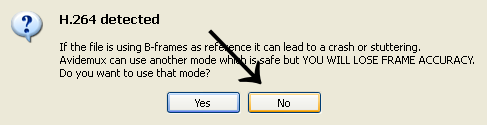
First of all, open she source file in avidemux. It will warn you about the possibility of crashes and stuttering if you don’t use a safe mode that lacks frame accuracy (being able to cut at the exact frame you select). For the sort of clip extraction we’re interested in doing, frame accuracy is very important, so you should click no.
(Note, whether avidemux will actually crash depends on the video, but I find that disabling the audio (see below) and as a last resort, not playing the video (only navigating with the previous and next frames/keyframes buttons, see below) helps. If not, you can try opening in safe mode, selecting around the area, saving the clip as mpeg2, for example, and then opening it again and cutting only the portion you want. Hopefully, this issue will be fixed in future versions of avidemux.)
If your source video is HD, avidemux will open with a very large screen. You can zoom out using the View menu above.

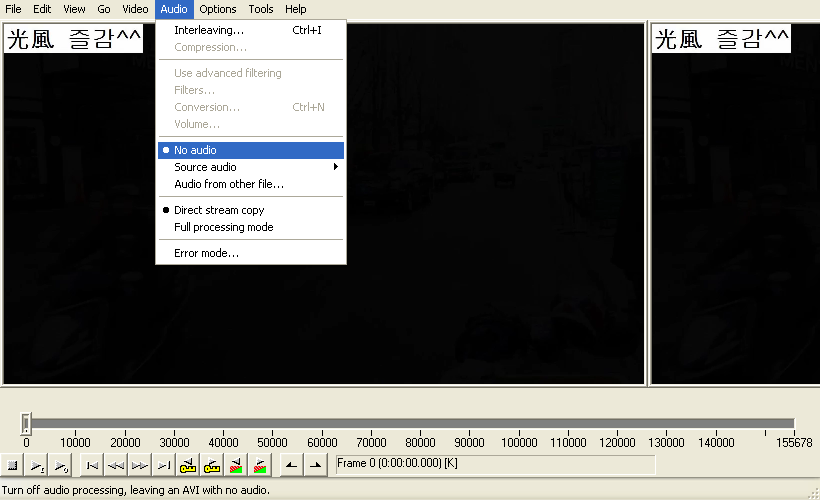
Disabling the audio track
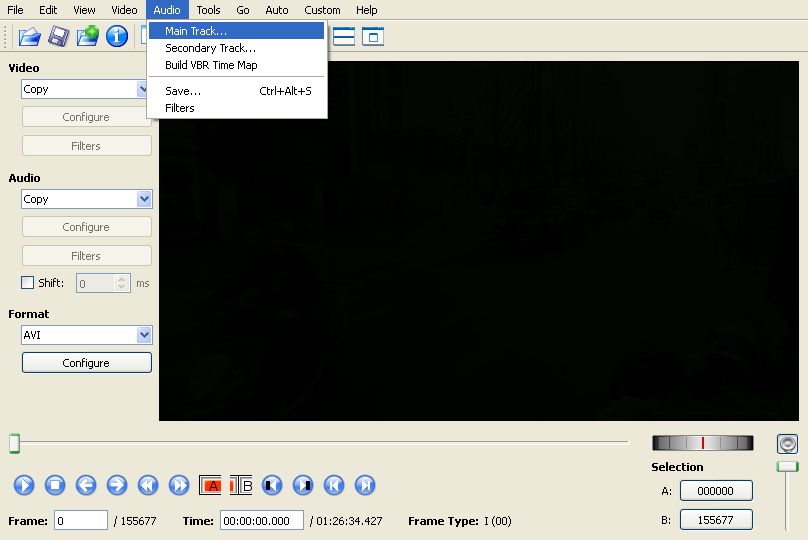
To disable the audio, so that it won’t be encoded in your clip, click the Audio menu above (not the section to the left), select Main Track..., then in Audio source:, select None, then click OK.

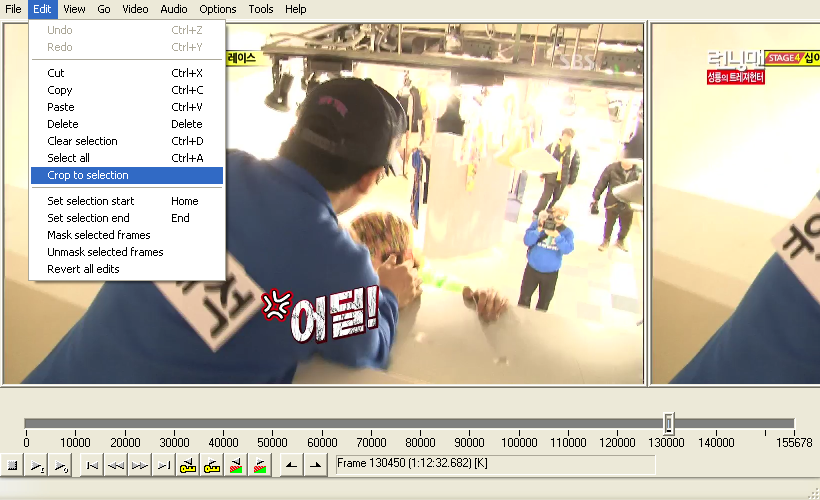
Cutting
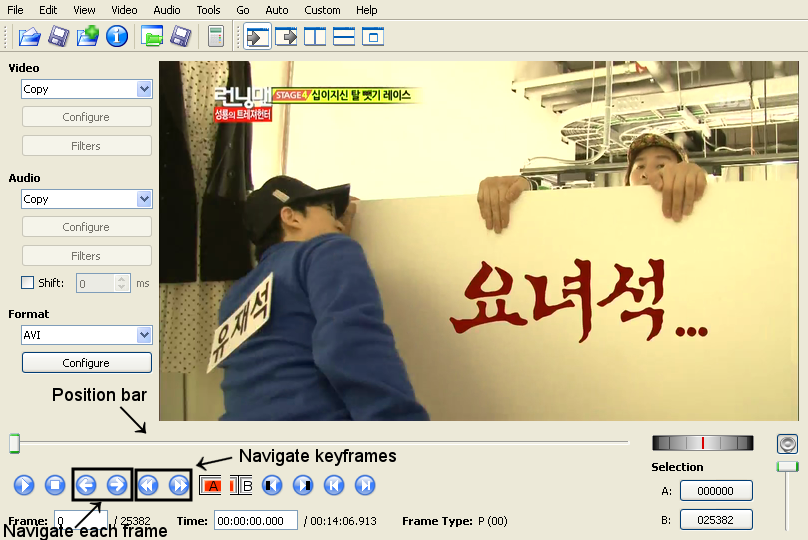
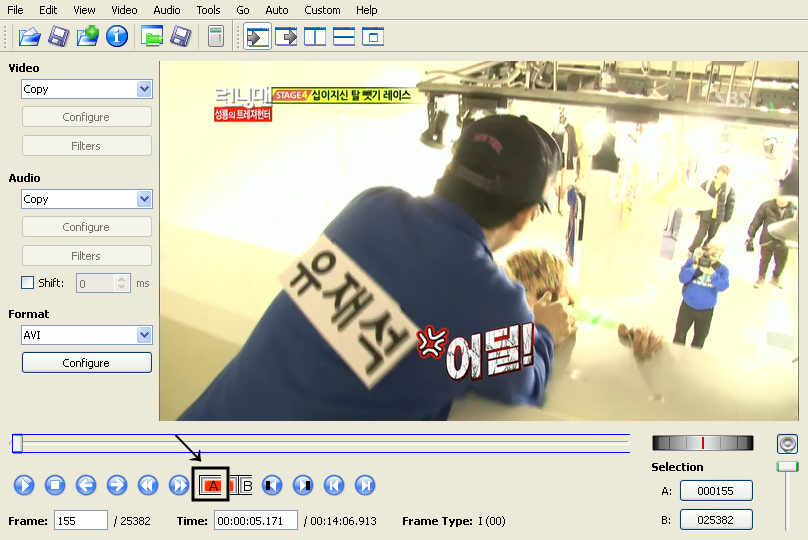
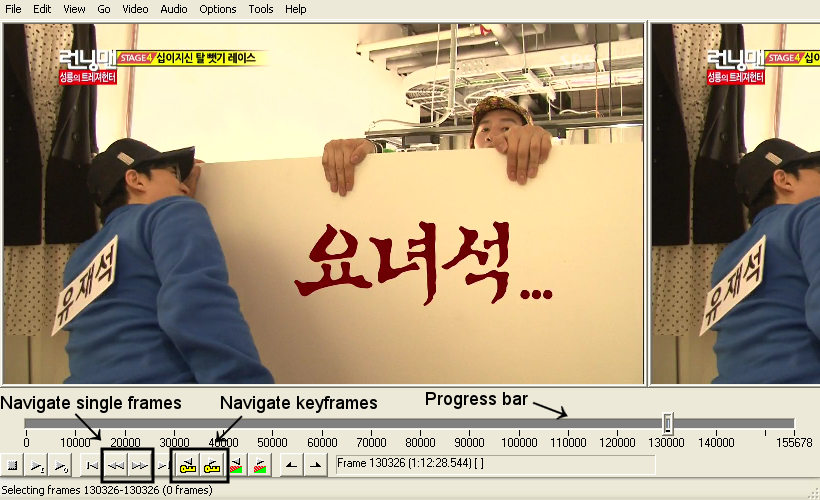
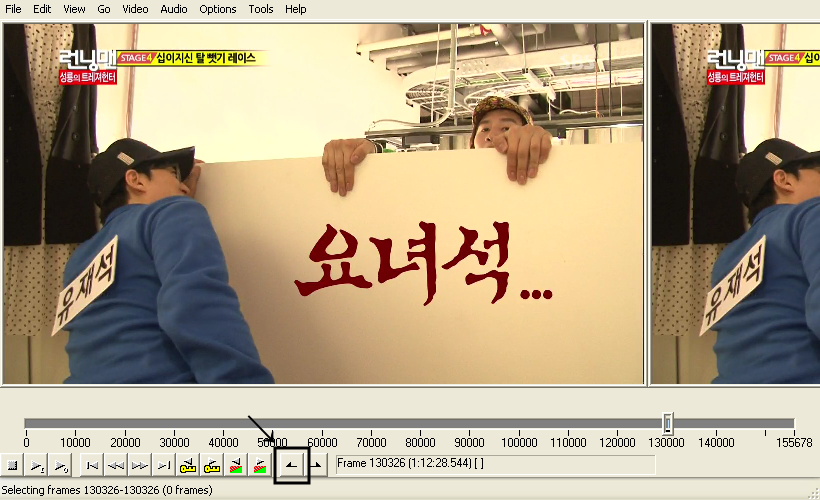
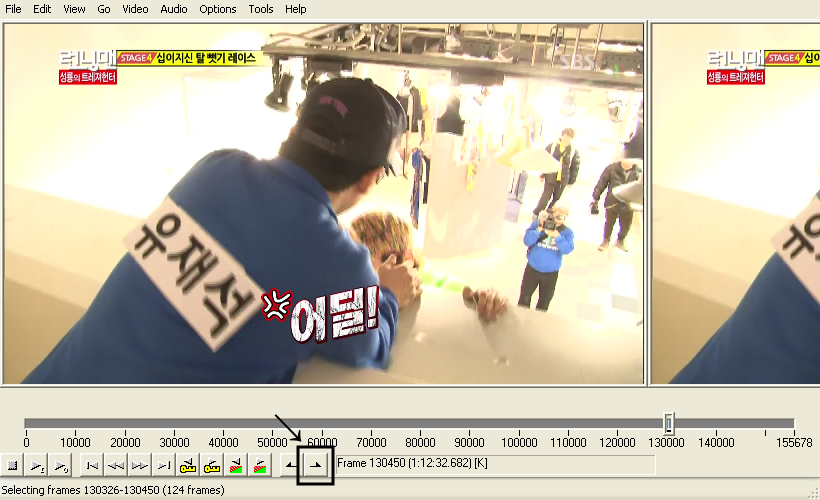
Navigate to the first frame you want included in your clip, using the scroll bar below the image, and also the buttons for previous and next frame or keyframe.
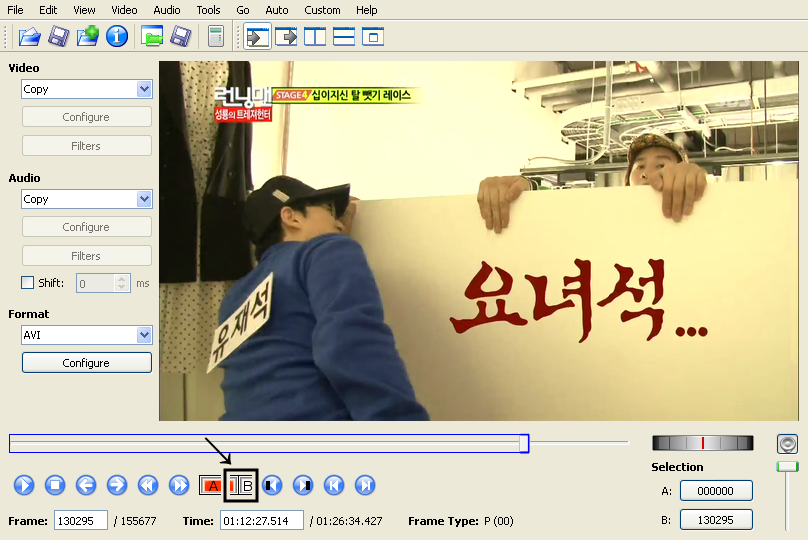
After you’ve found your first frame, click the B button, which will select from the beginning of the video to that frame.
Then click Edit and Cut, and that first portion of the video will be removed.
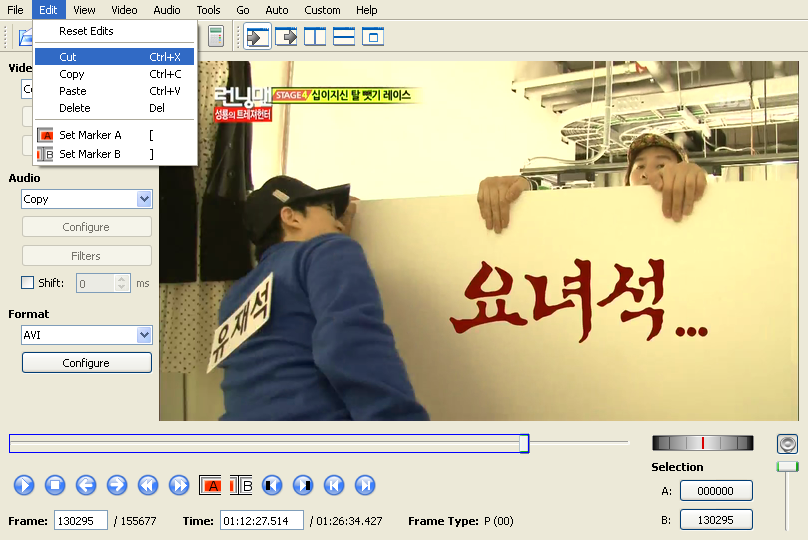
As you can probably guess, you should now navigate to the last frame you want in your clip, then move to the following one, click the A button, to select everything from that frame to the end of the video, and then Edit and Cut again.
Cropping and scaling
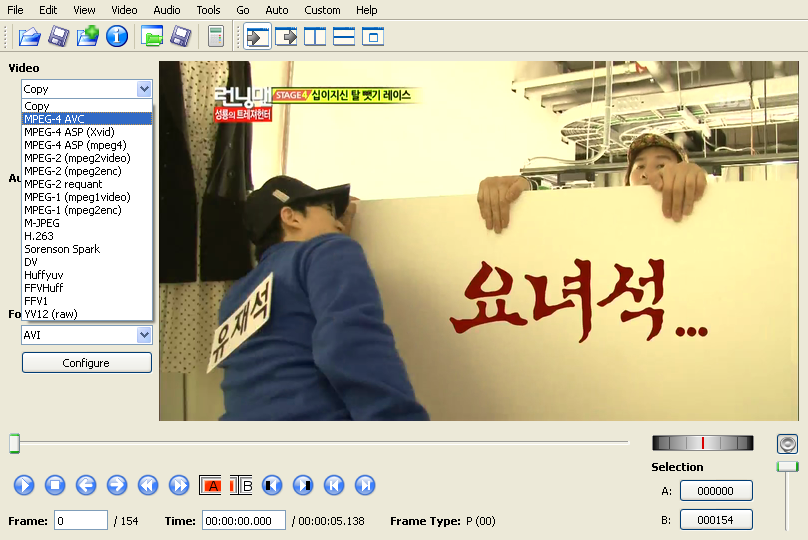
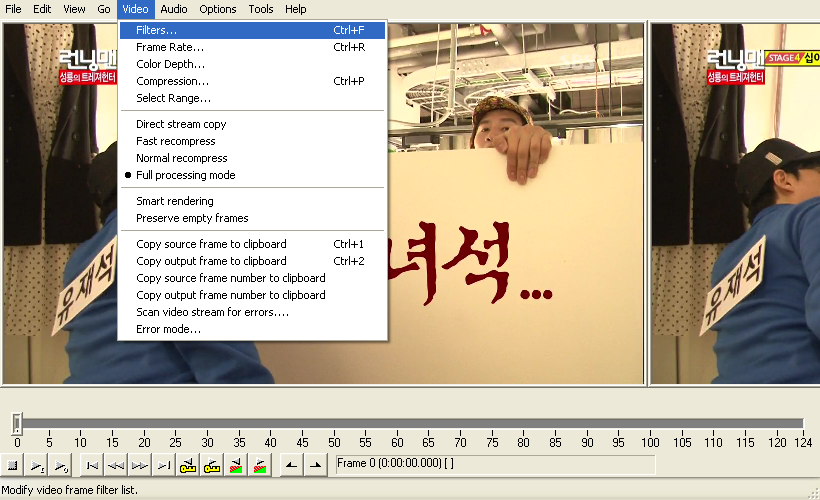
Before cropping and scaling in avidemux, we must select a video codec. Click the dropdown box below Video at the left and select MPEG-4 AVC (which is another name for H264).
After that, click the Filters button below it.
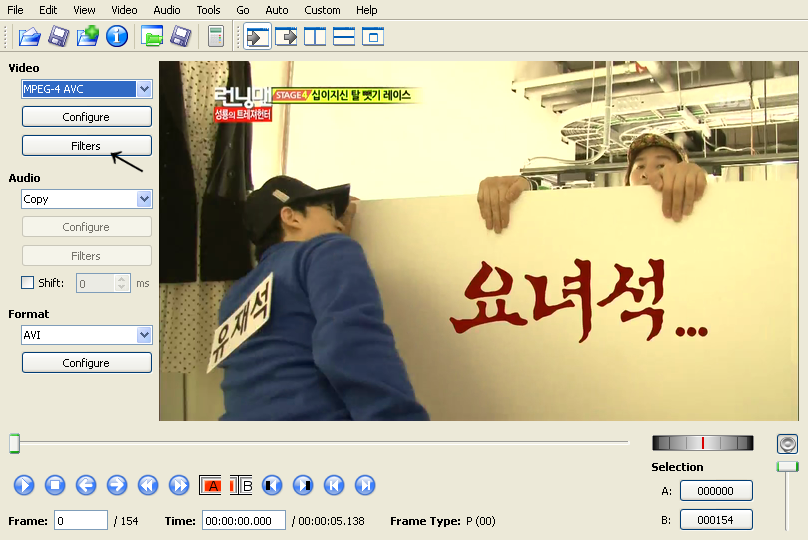
You will be presented with the filter manager window. Select Transform at the left, then Crop in the middle, and click the + button below.
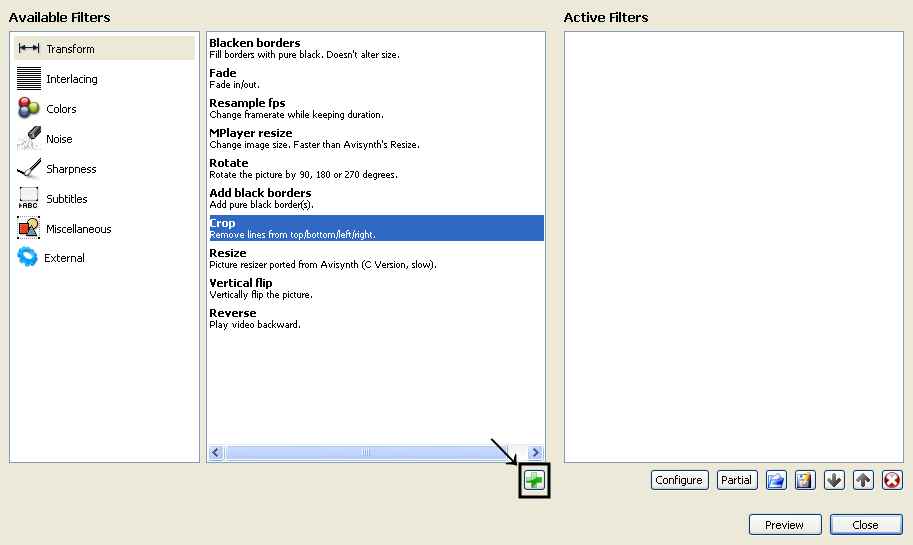
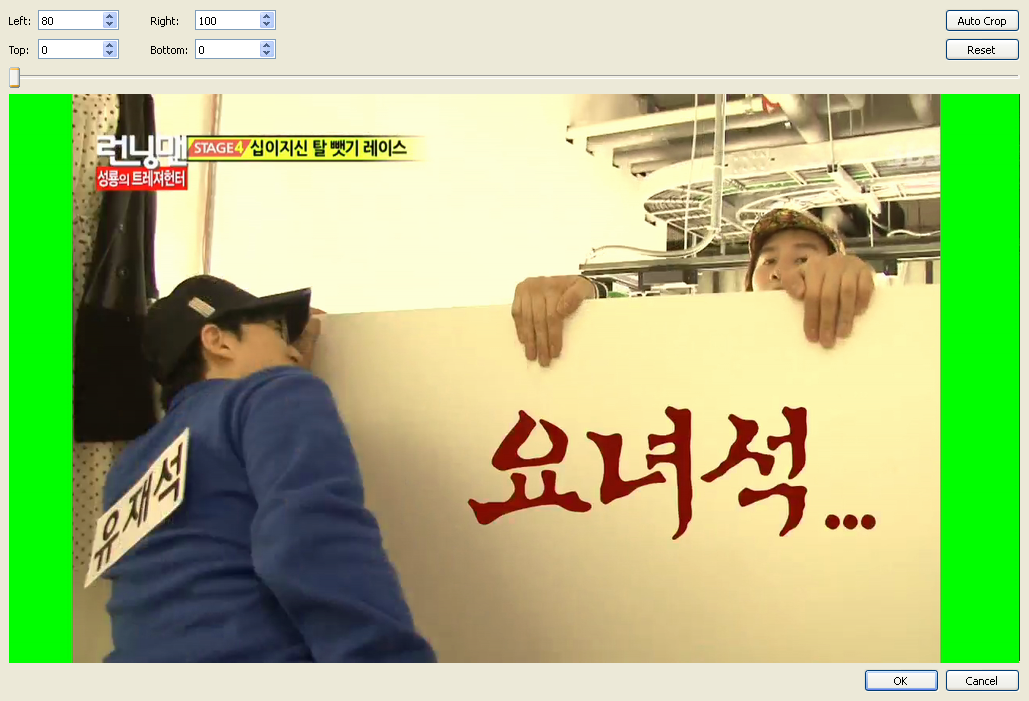
You will then be presented with the crop filter window. There, you have to write the amount of pixels you want to crop from each border. Avidemux doesn’t allow you to use the mouse here, but it at least shows you the resulting crop.
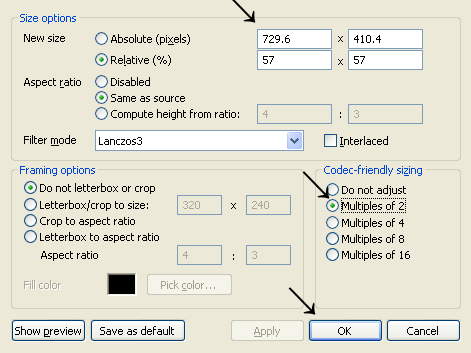
When you’re done, click OK and you’ll be brought back to the filter manager. Now select Resize in the middle and click the + button.
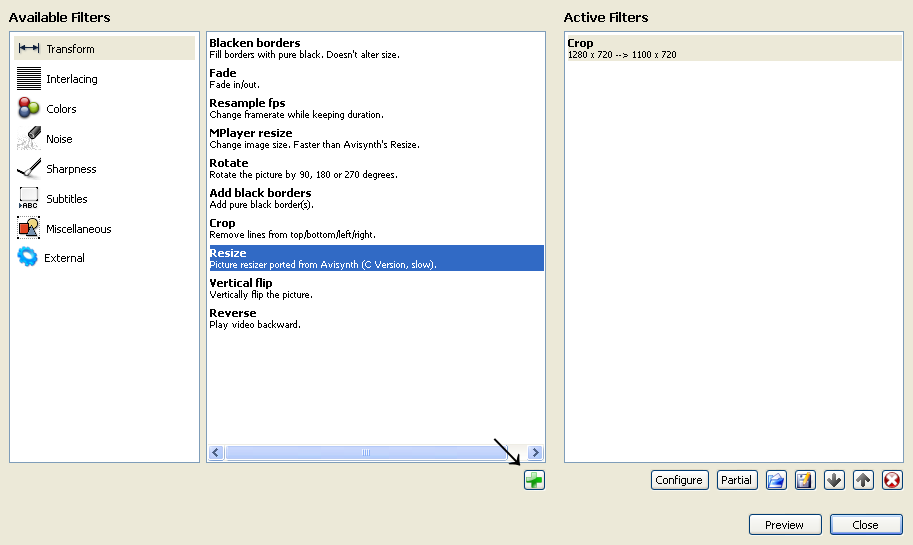
In the resize filter window, change the resize method to Lanczos3.
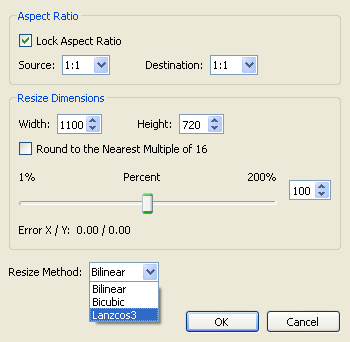
Then, you might want to check the Round to the nearest multiple of 16 box. You actually just need both values to be even, so you can do that manually as well. Select the new resolution in whichever way you prefer, then click OK.
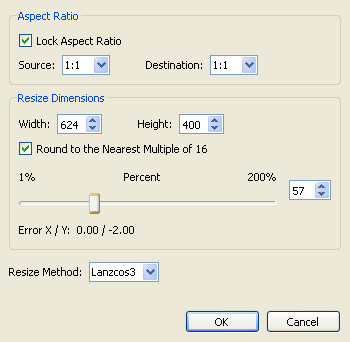
You can now close the filter manager window or click the Preview button to preview your changes.
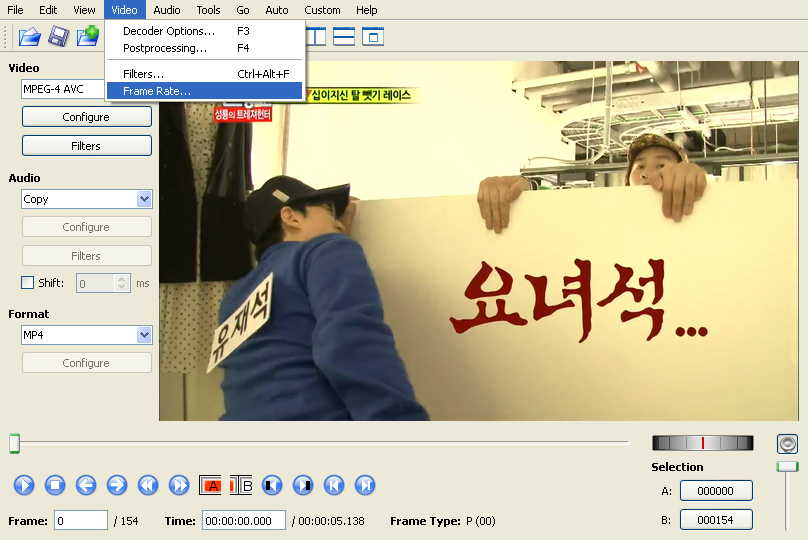
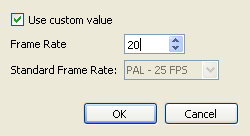
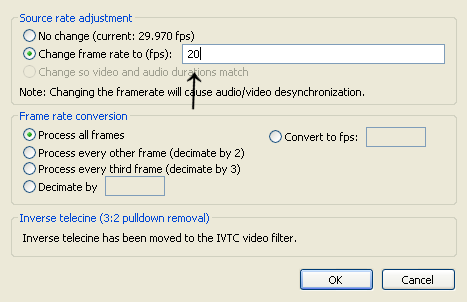
Changing the framerate
If you wish to keep the same framerate as the source video, you can skip this step. If you want a lower bitrate to create a slow motion effect (see discussion under the framerate section), Video at the top, then Frame Rate.... At the framerate window, select the value you want and press OK.
Encoding
Now that your clip is done, all that is left is to encode it. Click the Configure button below Video to the left.
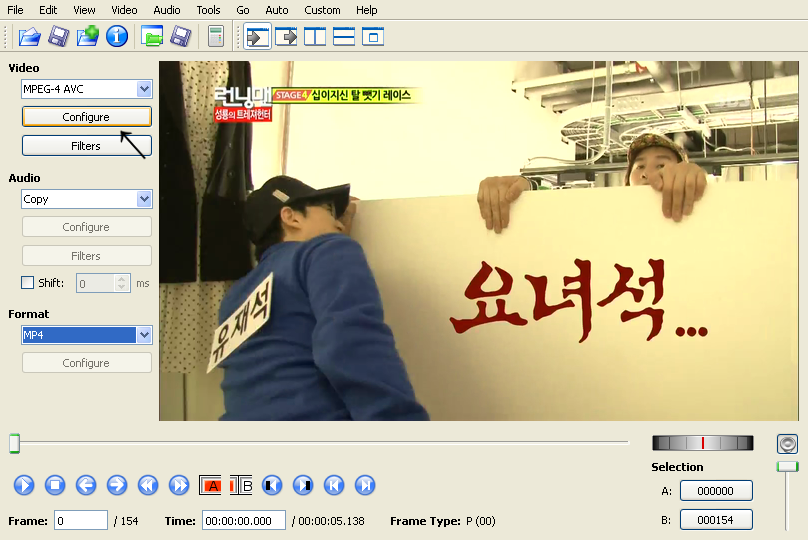
You will be presented with the x264 configuration window. Select the desired encoding mode and desired quality or bitrate (see discussion under the bitrate section) and click OK.
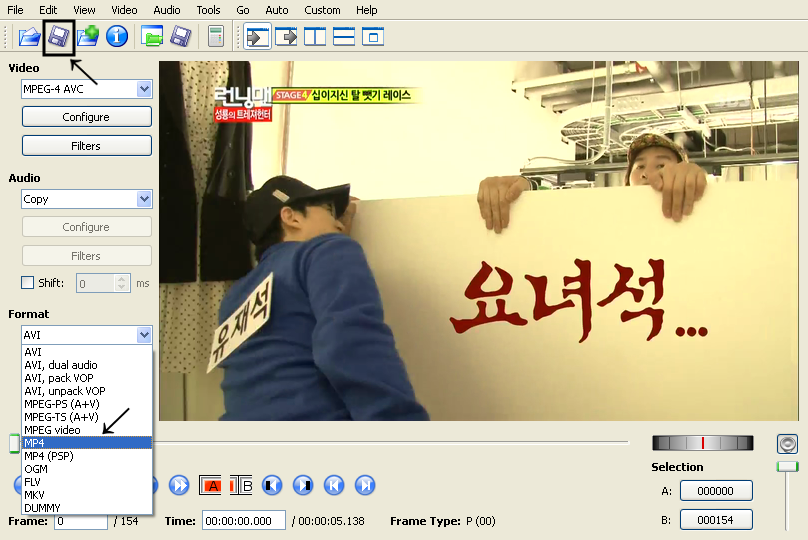
Finally, click the dropdown menu below Format to the left and select MP4. Then, click save button above and wait for the encoding to finish.
You now have an MP4 file containing H264 video which is already playable in many browsers (see formats section). If you want to transcode it to VP8 so you’ll have a WebM file, procceed to the ffmpeg section, otherwise, you’re done.
VirtualDub tutorial
This is the tutorial for cutting, cropping, resizing and encoding using virtualdub. If you want to use avidemux, see its section above.
Opening the video
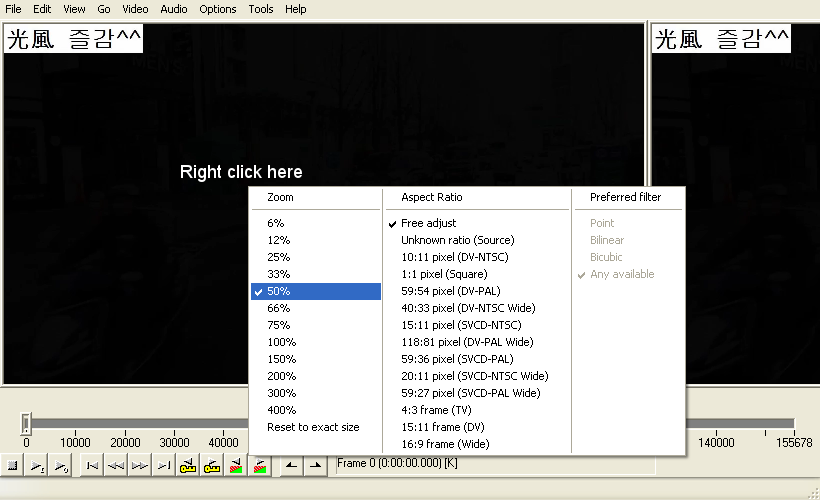
As with avidemux, if your source video is HD, virtualdub will open a very big window. You can zoom out by right clicking the video and selecting a new zoom level.
Disabling the audio track
To disable the audio, click Audio above, then select No audio.
Cutting
Navigate to the first frame you want included in your clip, using the scroll bar below the image, and also the buttons for previous and next frame or keyframe.
After finding the first frame, click the Mark in button. Take note of the frame number, because, when selecting the crop region below, virtualdub will forget your cut and you’ll have to locate this frame again.
Then, navigate to the last frame you want in your clip, and click the Mark out button.
Now just click Edit and Crop to selection.
Cropping and scaling
First, click Video, then Filters. You’ll be taken to the filters window.
Click the Add... button to the right.
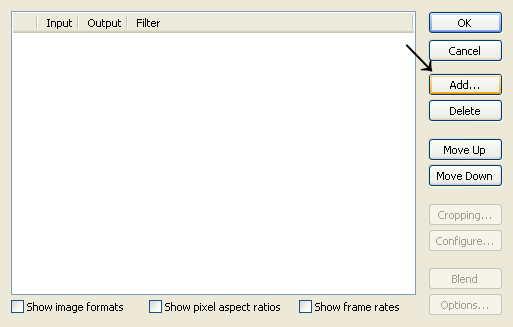
In the add filter window, select resize and click OK.
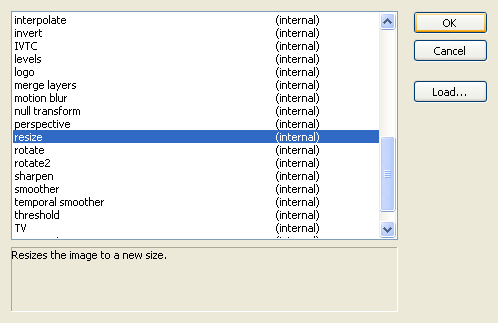
In the resize filter window, select the new resolution you want, then mark Multiples of 2 under Codec-friendly sizing. Optionally, change the Filter mode to Lanczos3, or just leave it as bicubic. Click OK.
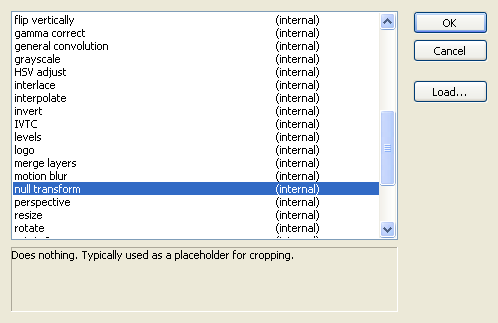
Back to the filters window, click the Add... button again, and this time, select null transform.
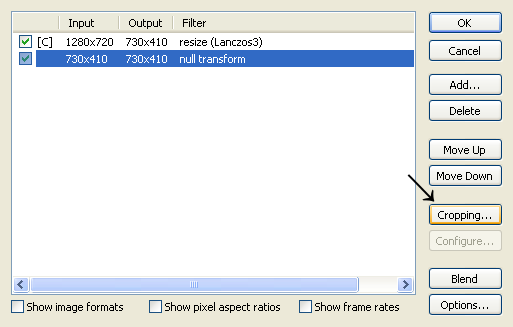
You’ll be taken back, once again, to the filters window. This time, click the Cropping... button.
Now is the time I mentioned above, where you’ll have to find your cut again, since virtualdub will present you with the whole video. The good news is that you can crop using the mouse, by dragging in the border around the image.
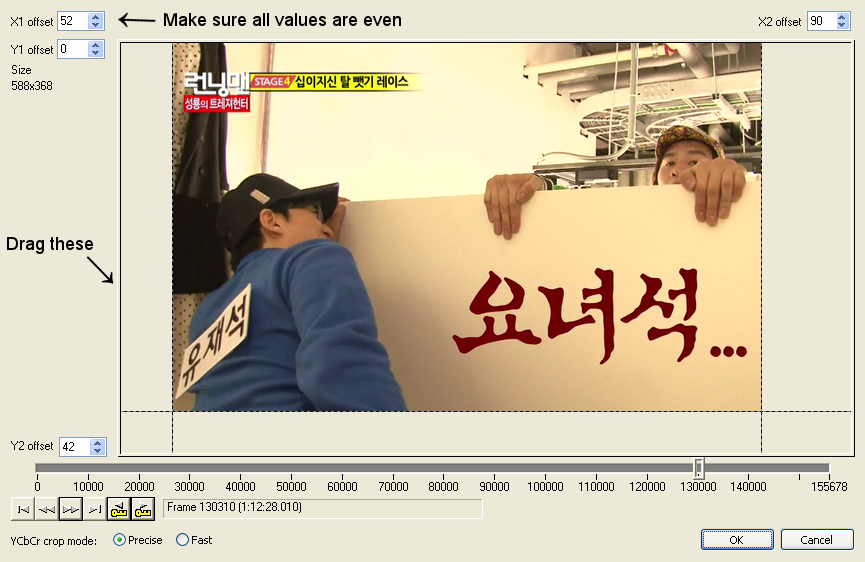
When you’re done, make sure all values are even, then click OK, and close the filters window by clicking OK there as well.
Changing the framerate
If you wish to keep the same framerate as the source video, you can skip this step. If you want a lower bitrate to create a slow motion effect (see discussion under the framerate section), Video at the top, then Frame Rate.... At the framerate window, select the value you want and press OK.

Encoding
Now that your clip is done, all that is left is to encode it. Click Video, then Compression....
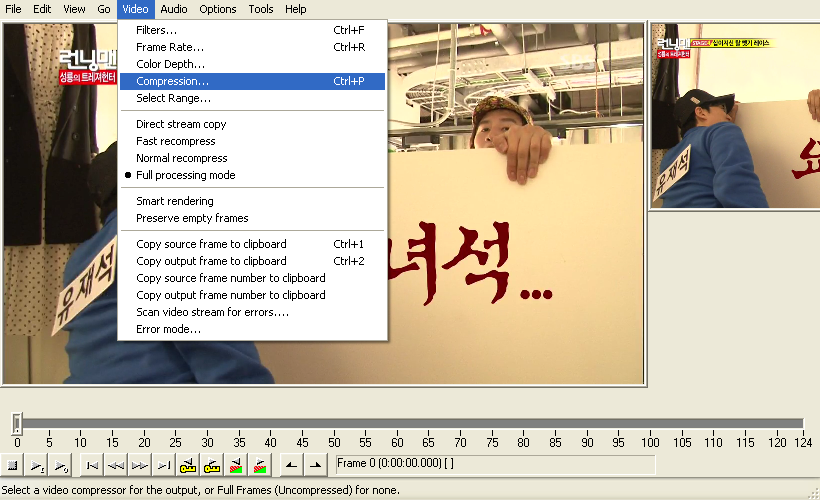
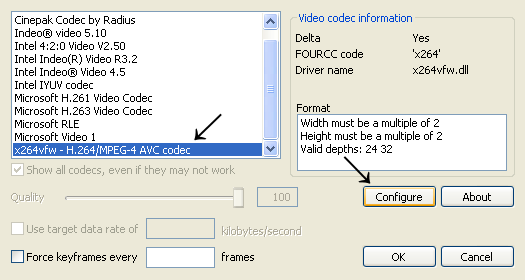
Select x264vfw and click the Configure button.
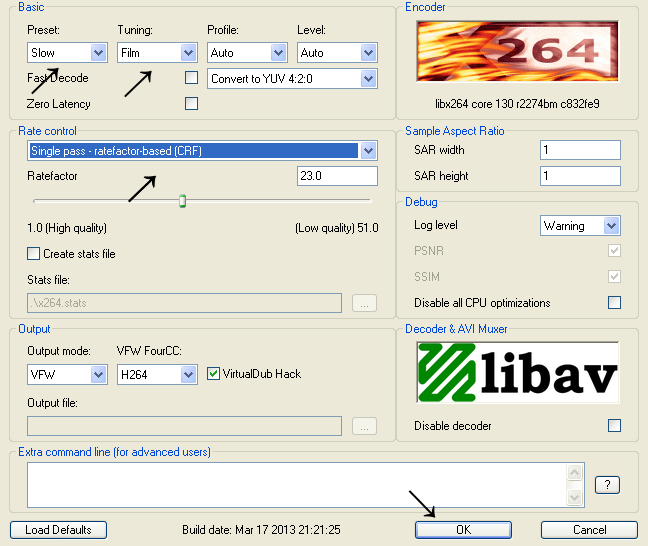
Change Preset to slow, Tuning to film, then click the dropdown box under Rate control, select whichever option you prefer (see bitrate section above for more info), and click OK.
Finally, click File then Save as AVI... and choose a filename to save your clip under. You will end up with H264 video in an AVI file, so you’ll have to either remux it or reencode it to vp8, as explained in the ffmpeg section below.

FFmpeg tutorial
FFmpeg is a command line program, which means you have to run it in a terminal. For most windows users, that means the DOS prompt. See this on how to open it.
In a terminal, you’ll be presented with a prompt for you to run your commands. A command line is composed of a program name at the beginning, followed by zero or more arguments. Arguments are separated from each other by spaces, which is why, if an argument contains a space, it must be enclosed in double quote signs. By typing enter, the terminal will execute that command line.
Before running ffmpeg, you have to change into the directory where your clip is. To do this, use the command cd, followed by the folder’s path. If it’s in another drive, you might have to first type the drive letter, followed by a colon. For example:
c:
cd "\Documents and Setting\Default User\My Documents\My Videos\"
You can press TAB to autocomplete the folder names for you. For more information, see this.

Reencoding to VP8
So, start up your terminal and go into the directory containing your newly created clip. Then, run the following line (assuming you placed the ffmpeg binary in the system32 directory, as described in the installation section):
ffmpeg -i <input_file_name> -codec:v libvpx -quality good -cpu-used 0 -b:v <bitrate>k -an -threads 4 <output_file_name>.webm
Replace <input_file_name> with the name of your clip, <bitrate> with the desired bitrate (as explained in the bitrate section, you shouldn’t use libvpx’s constant quality for short clips) and <output_file_name> with the desired filename for the reencoded video, which should end in .webm so ffmpeg knows which muxer to use.
Also, make sure that the bitrate ends with the letter k, or else ffmpeg will assume you mean bits and will encode with a very low bitrate instead of what you want. So, for example, if you want 2000 kbps, you must use -b:v 2000k.
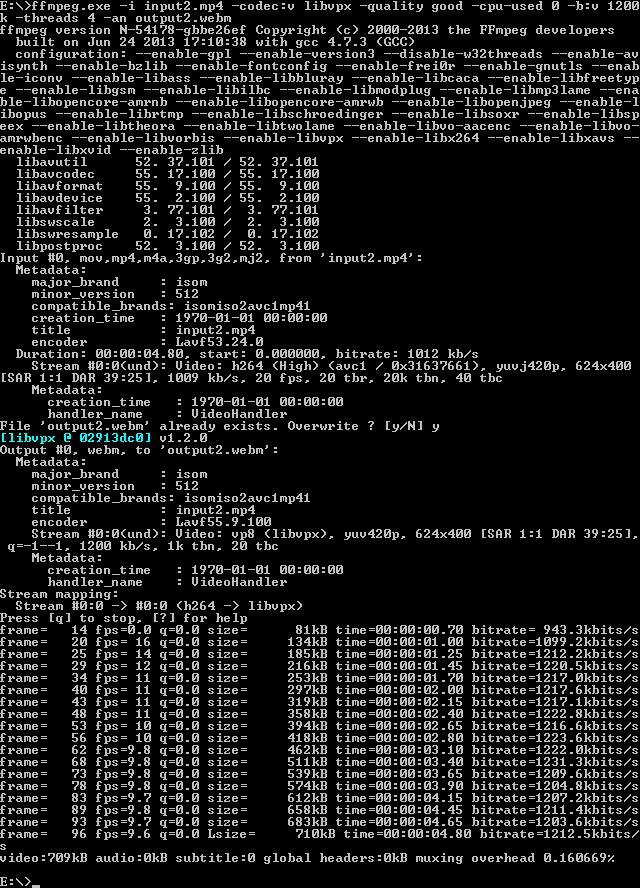
By the end of the encode, you’ll have a WebM file that is ready to be played by most browsers.
Remuxing to MP4
VirtualDub always muxes to AVI, which means you have to remux the video before being able to play it in a browser.
Warning: during testing, I was unable to get an H264 encode from VirtualDub to play in the browsers, it would only play in media players. It seems to be x264vfw’s fault. I’d advise you to always reencode to VP8 as described in the previous section.
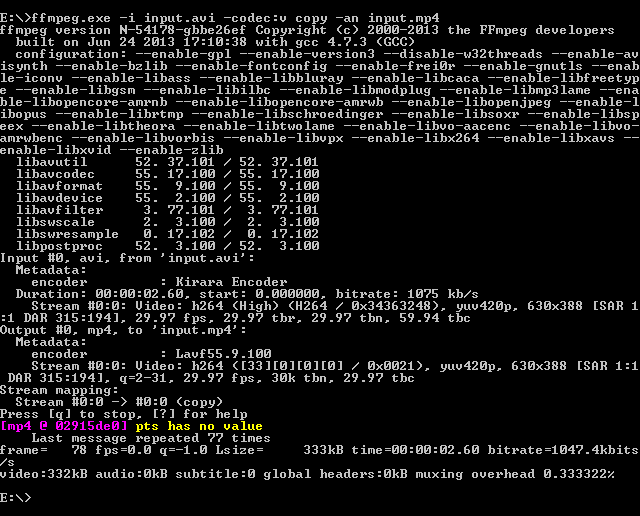
To simply remux a video, run the following line:
ffmpeg -i <input_file_name>.avi -codec:v copy -codec:a copy <output_file_name>.mp4
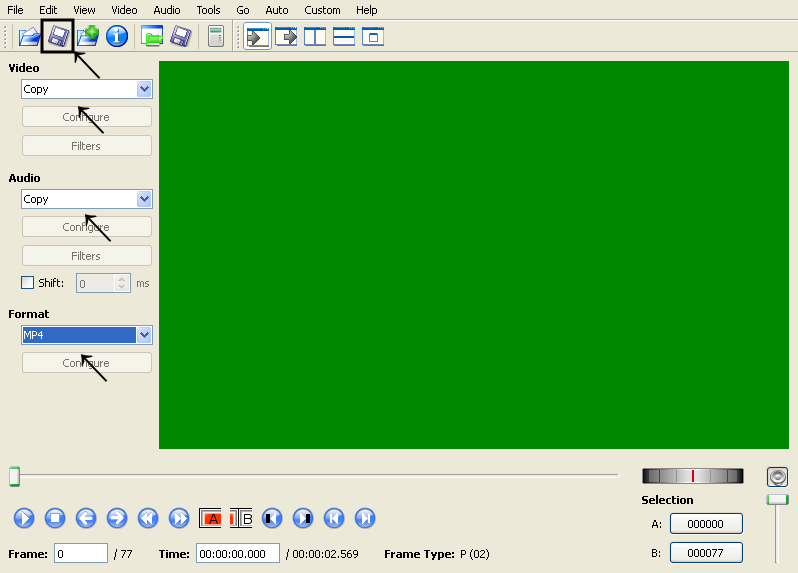
Note: You can also use avidemux by opening the video, leaving video and audio as copy, then changing format to mp4 and saving.
The clip created during the making of this tutorial can be found here.
